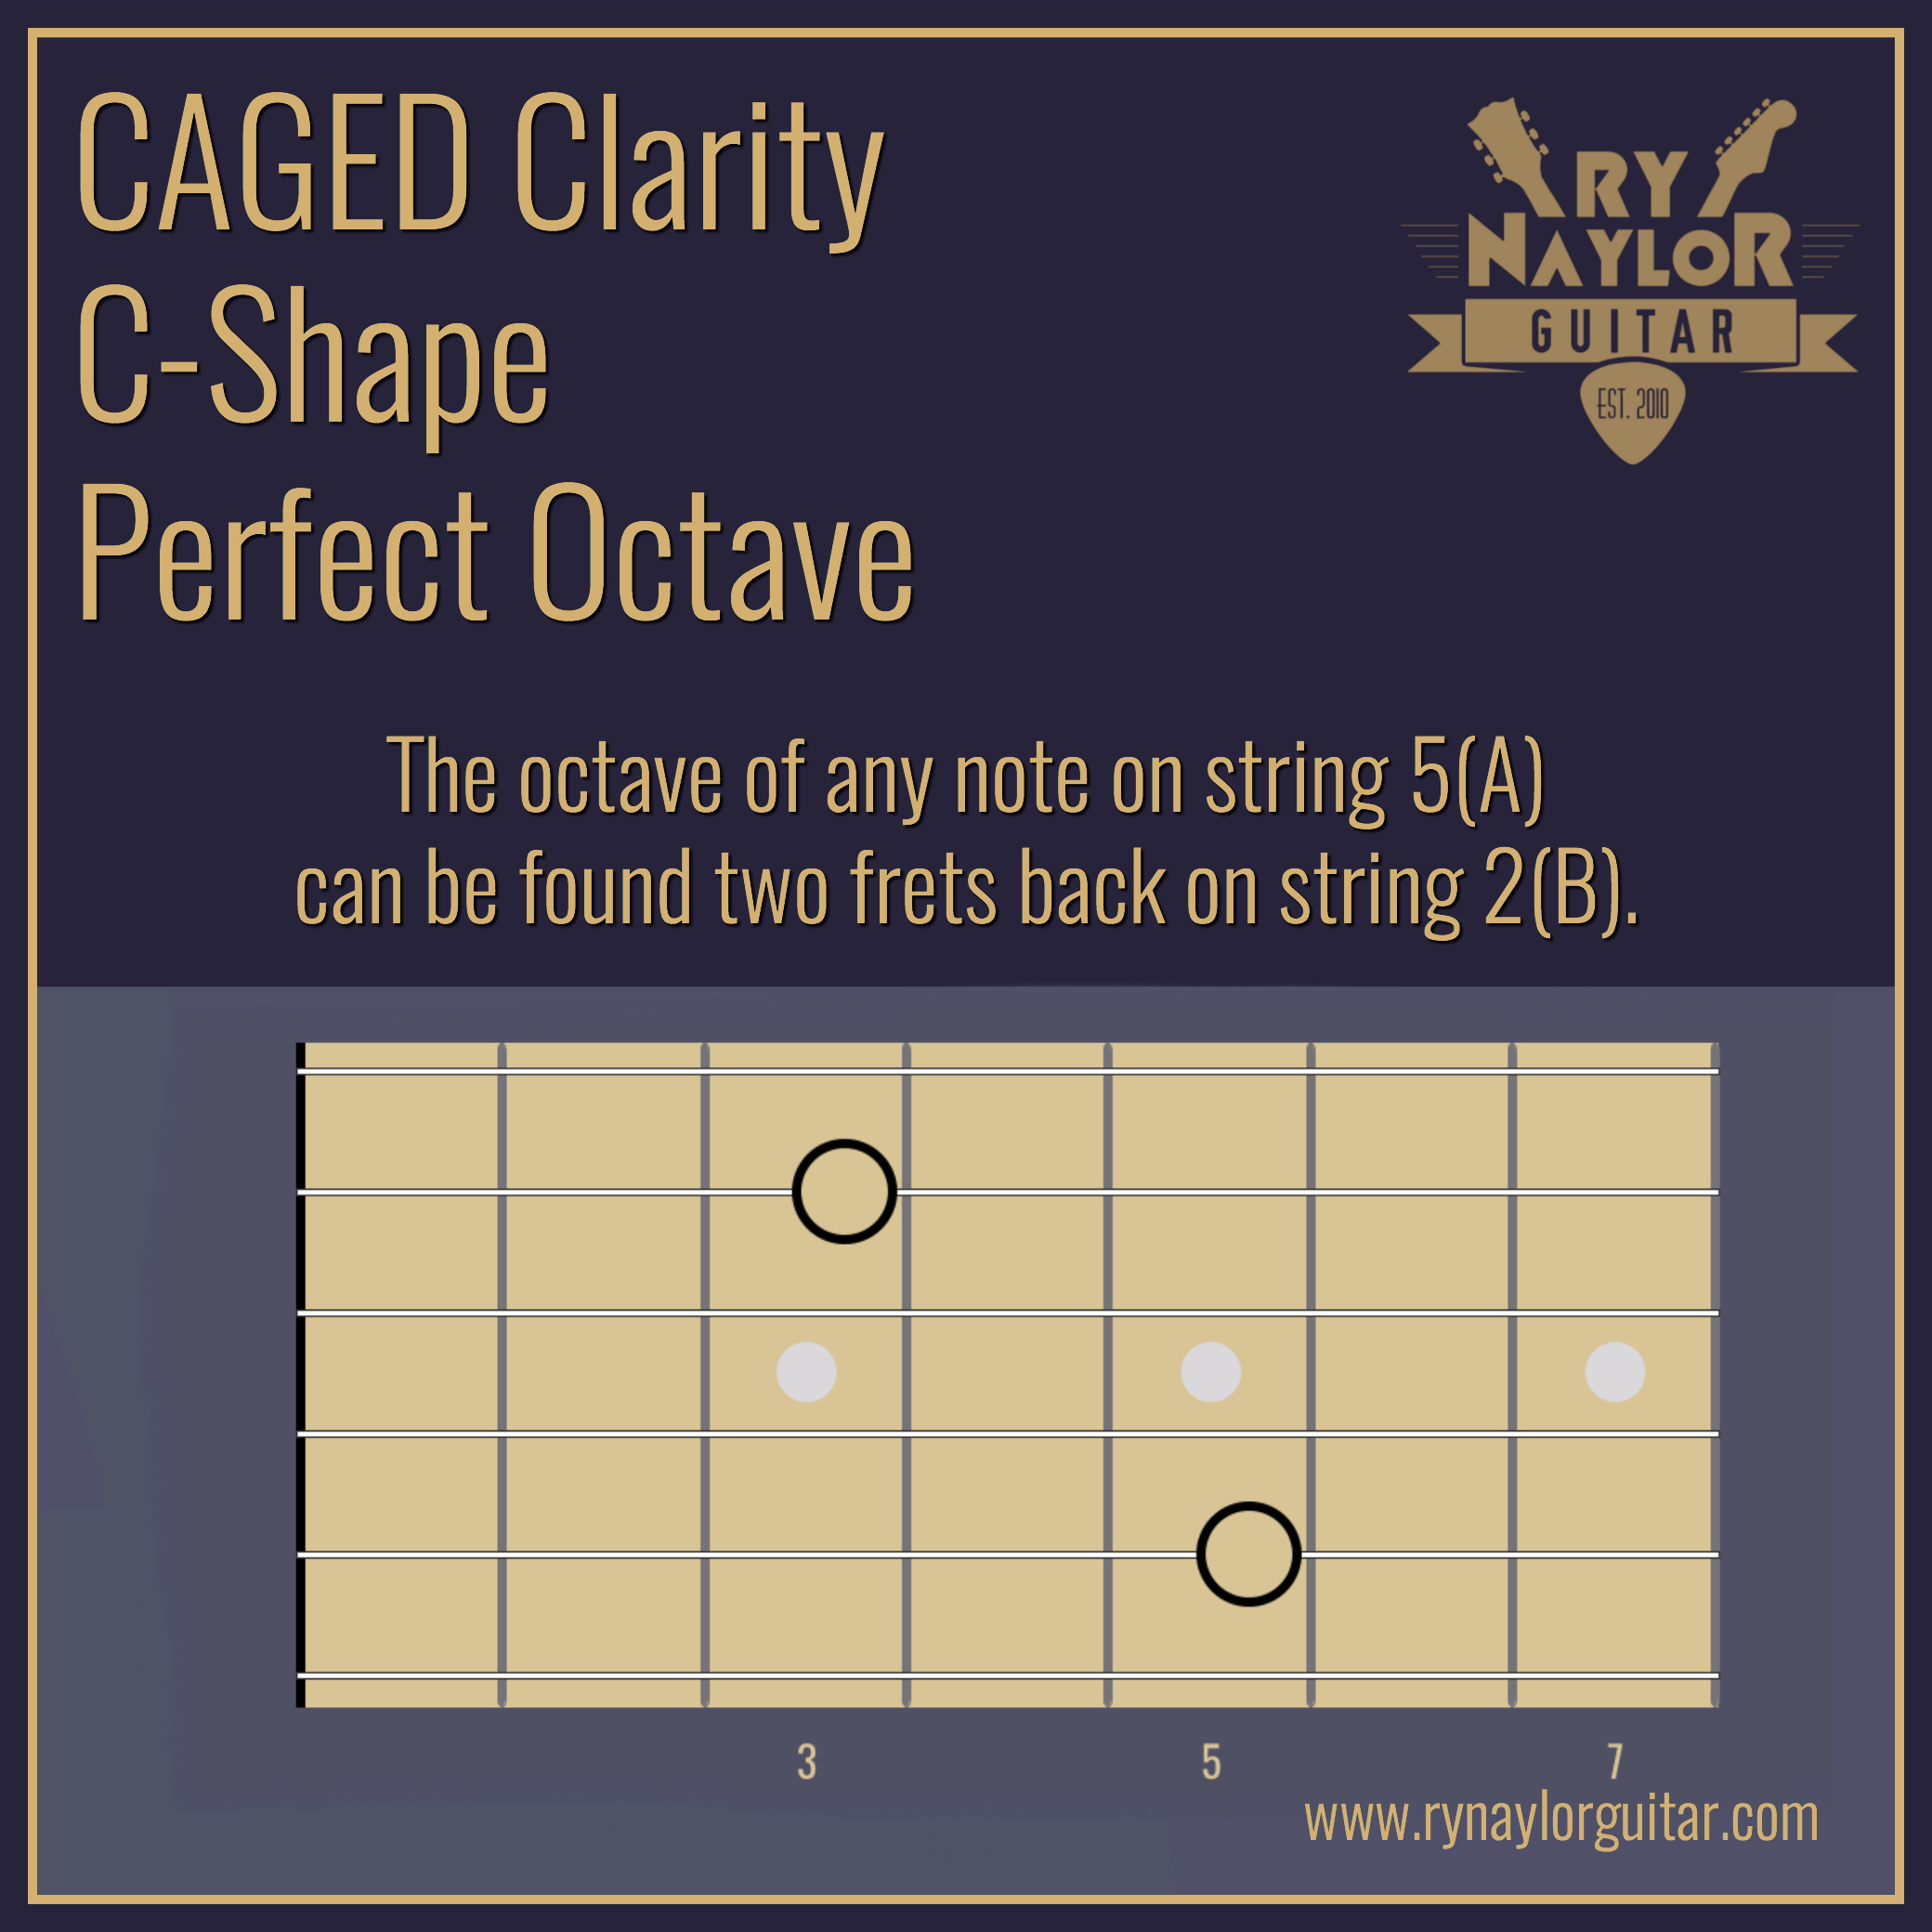
Confused by the Guitar Fretboard? This will help!

In this lesson, I wanted to improve your confidence with moving notes around the fretboard whilst maintaining the same pitch (unison) or moving a note higher or lower in pitch (using octave shapes).

This is a key skill for working out music on the instrument by ear, but it will also allow you to explore different ways to play your own riffs or melodic ideas.

The octave shapes also form (what I like to call) the 'backbone' of the CAGED system and they are 'Layer 1' in my own Guitar Blueprint course. 

As I mention in the video, these ideas for part of my Fretboard Mastery eBook.  You can get your free copy from my online store.

Having some fun with the Mixolydian Mode

The latest scale chart on my Instagram feed was the D mixolydian mode (see below).

I’m often asked what chords work well together to really get the sound of the mode, so I wrote and recorded a little example for Instagram:

Keeping the tonic in the bass of a chord progression really helps to establish the sound of the mode so I wrote a basic progression of D-Am-G-D but played them as triads over the open D string. This then creates a series of slash chords. They were embellished a little with some sus chords and a little bonus C/D in the Am measure.

The improvised solo was trying to hit the chord tones, especially the C note over the Am chord to further establish us clearly in D mixolydian, the C note (the b7) being the characteristic colour tone of the mixolydian mode.

Learning the fretboard is a cinch with the CAGED System

I'm often asked about how to learn the fretboard and what my approach is when it comes to soloing and improvising.  For me, the best approach is the CAGED system, in which we compartmentalise the fretboard according to a series of octave shapes around which we can form chord shapes, arpeggios, triads, pentatonics, and diatonic scales. 

I have a new series of posts on my Instagram feed named CAGED Clarity to explain this approach in more detail and how I like to progressively present it to my students.  All of the examples that you can find below take the 'C-shape' in the key of D major.

Octave Shape

The starting point for this 'C-shape' approach is the 5-2 octave shape.  Any note found on String 5(A) can be played an octave higher by going back (towards the nut) two frets on string 2(B).
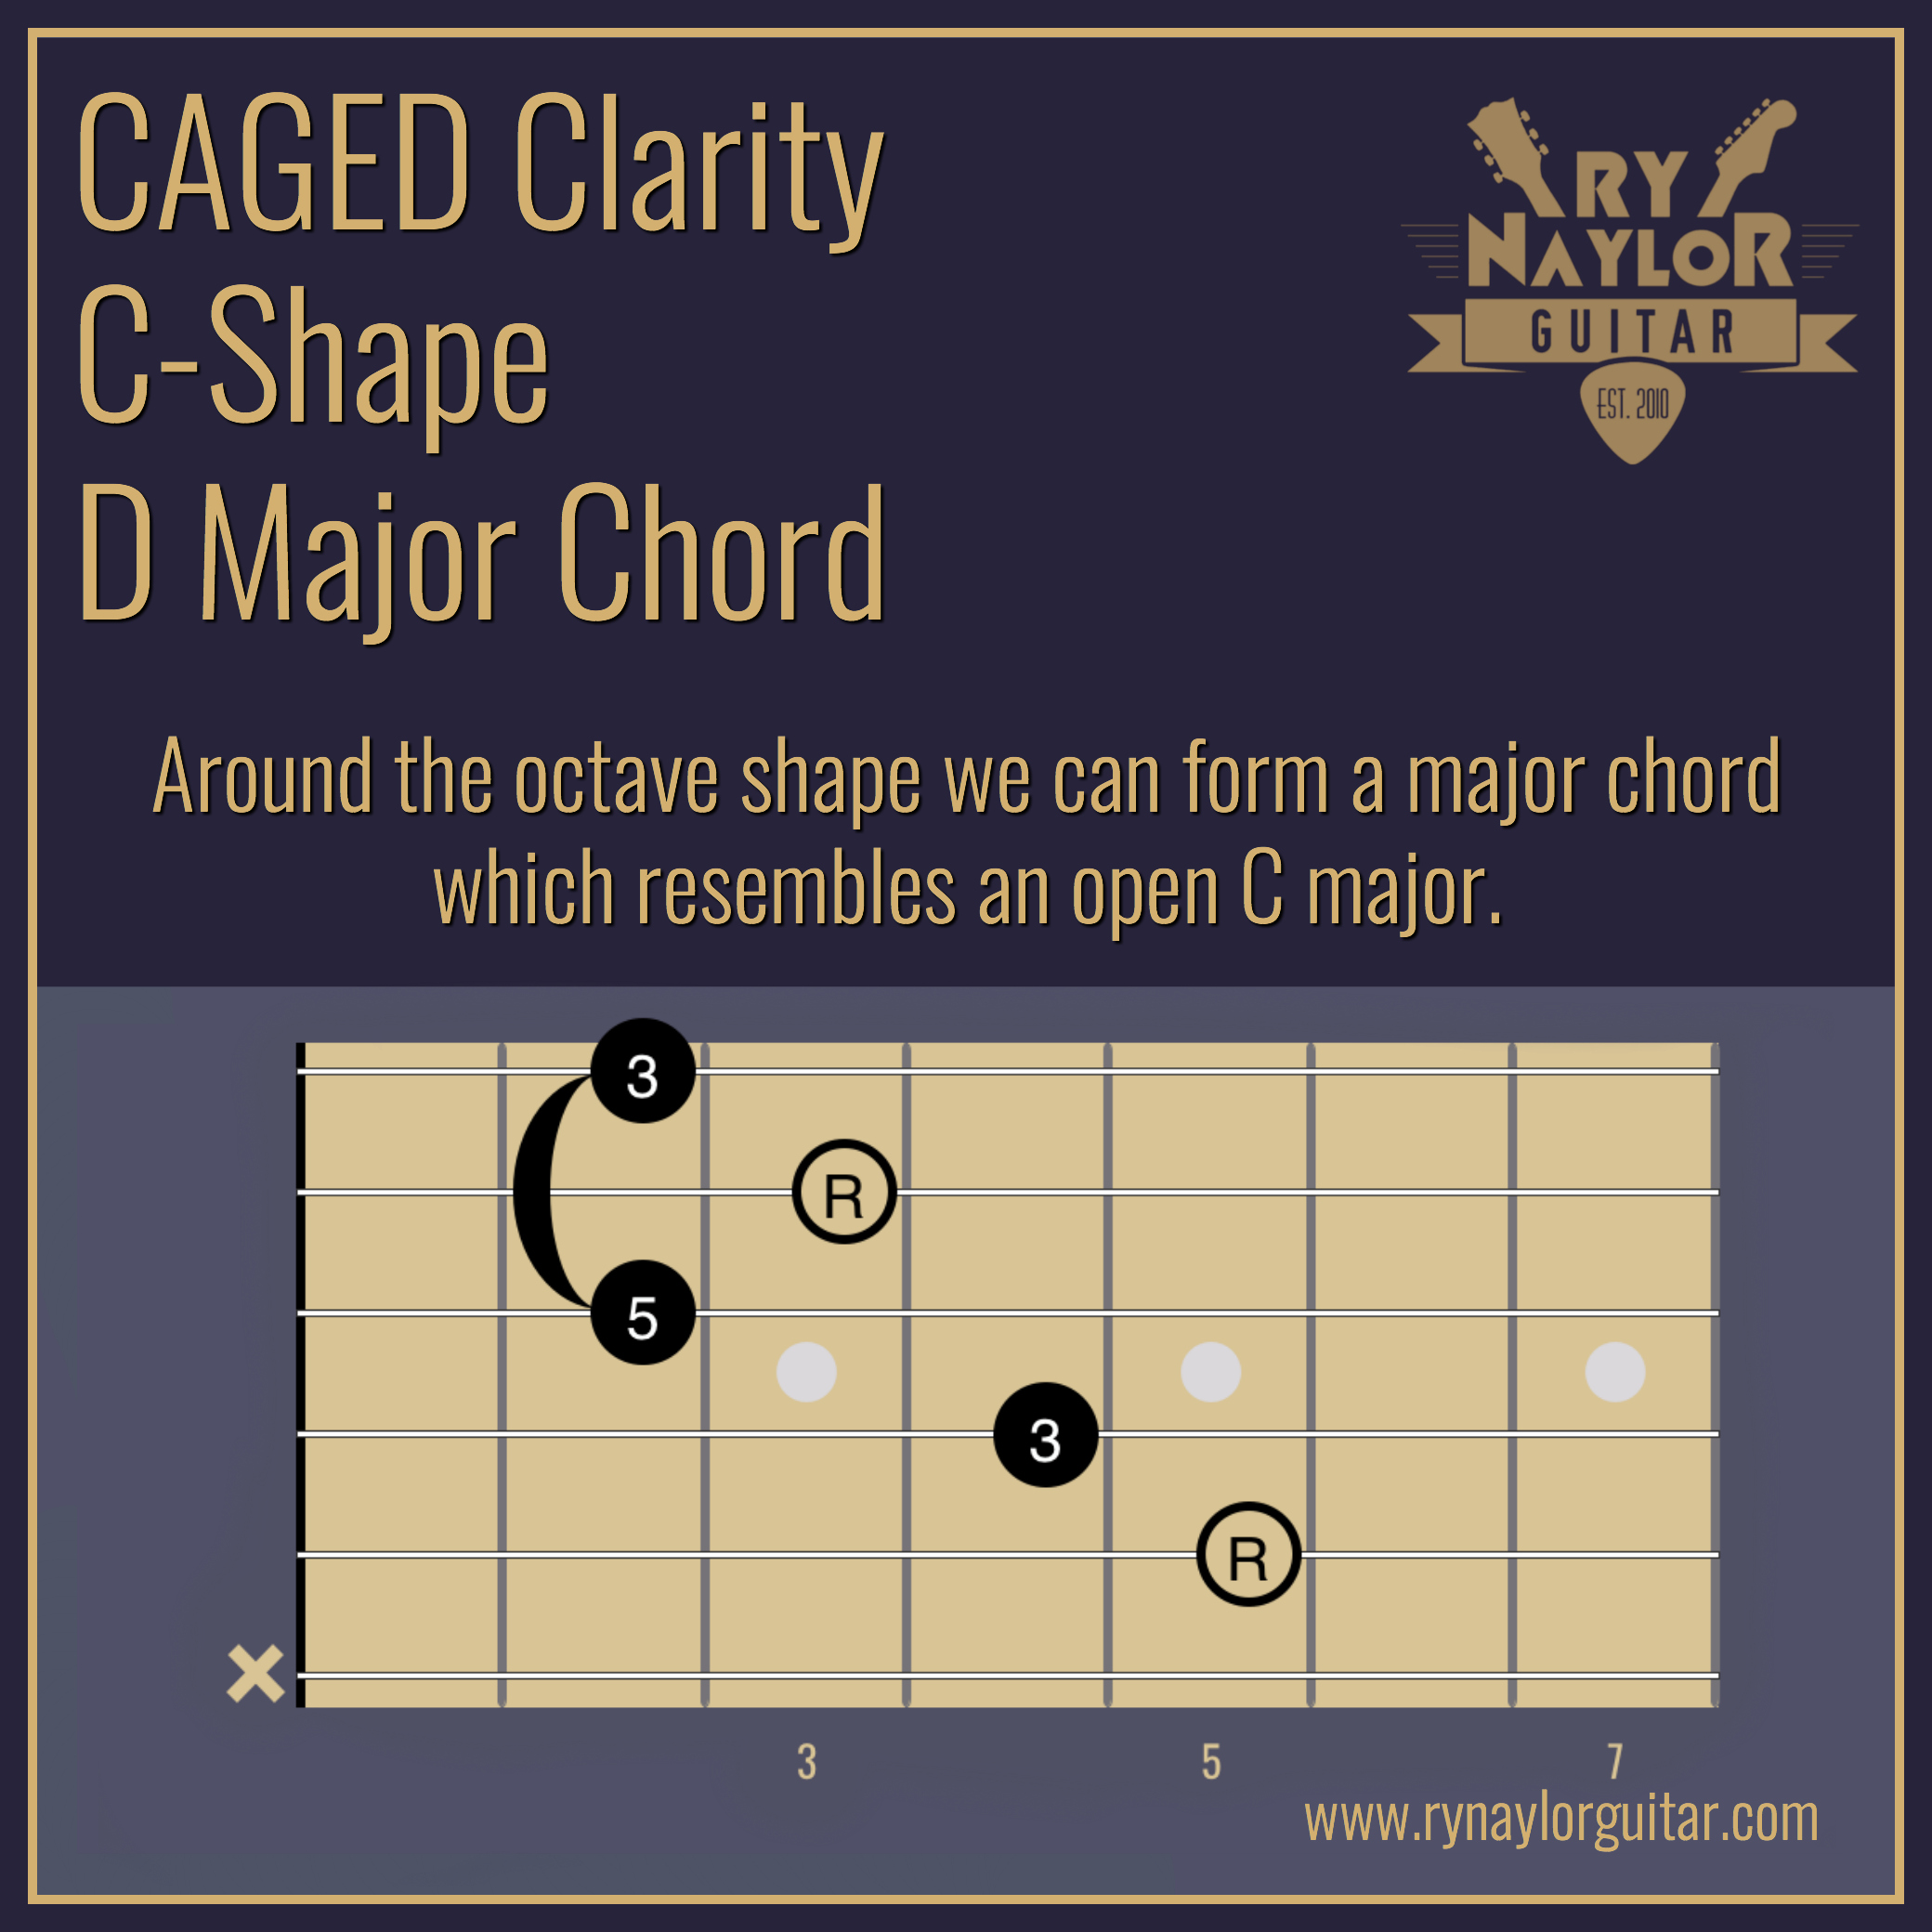
Major Chord

Around the octave shape we can superimpose the shape of an open position C major chord.  Hence the ‘C-shape’ name.   When doing so there is a barre finger required to fret strings 1(E) and 3(G) which are open strings in the open position C major.  Finger two will grab the root note on string 2(B).  Finger 3 will fret the major 3rd on string 4(D) and finger 4 will fret the root note on string 5(A).  It is as if we are playing a C chord with a capo at the 2nd fret.  The root note is now a D at the 5th fret of string 5(A) so this is a D major chord (but in the C-shape). 
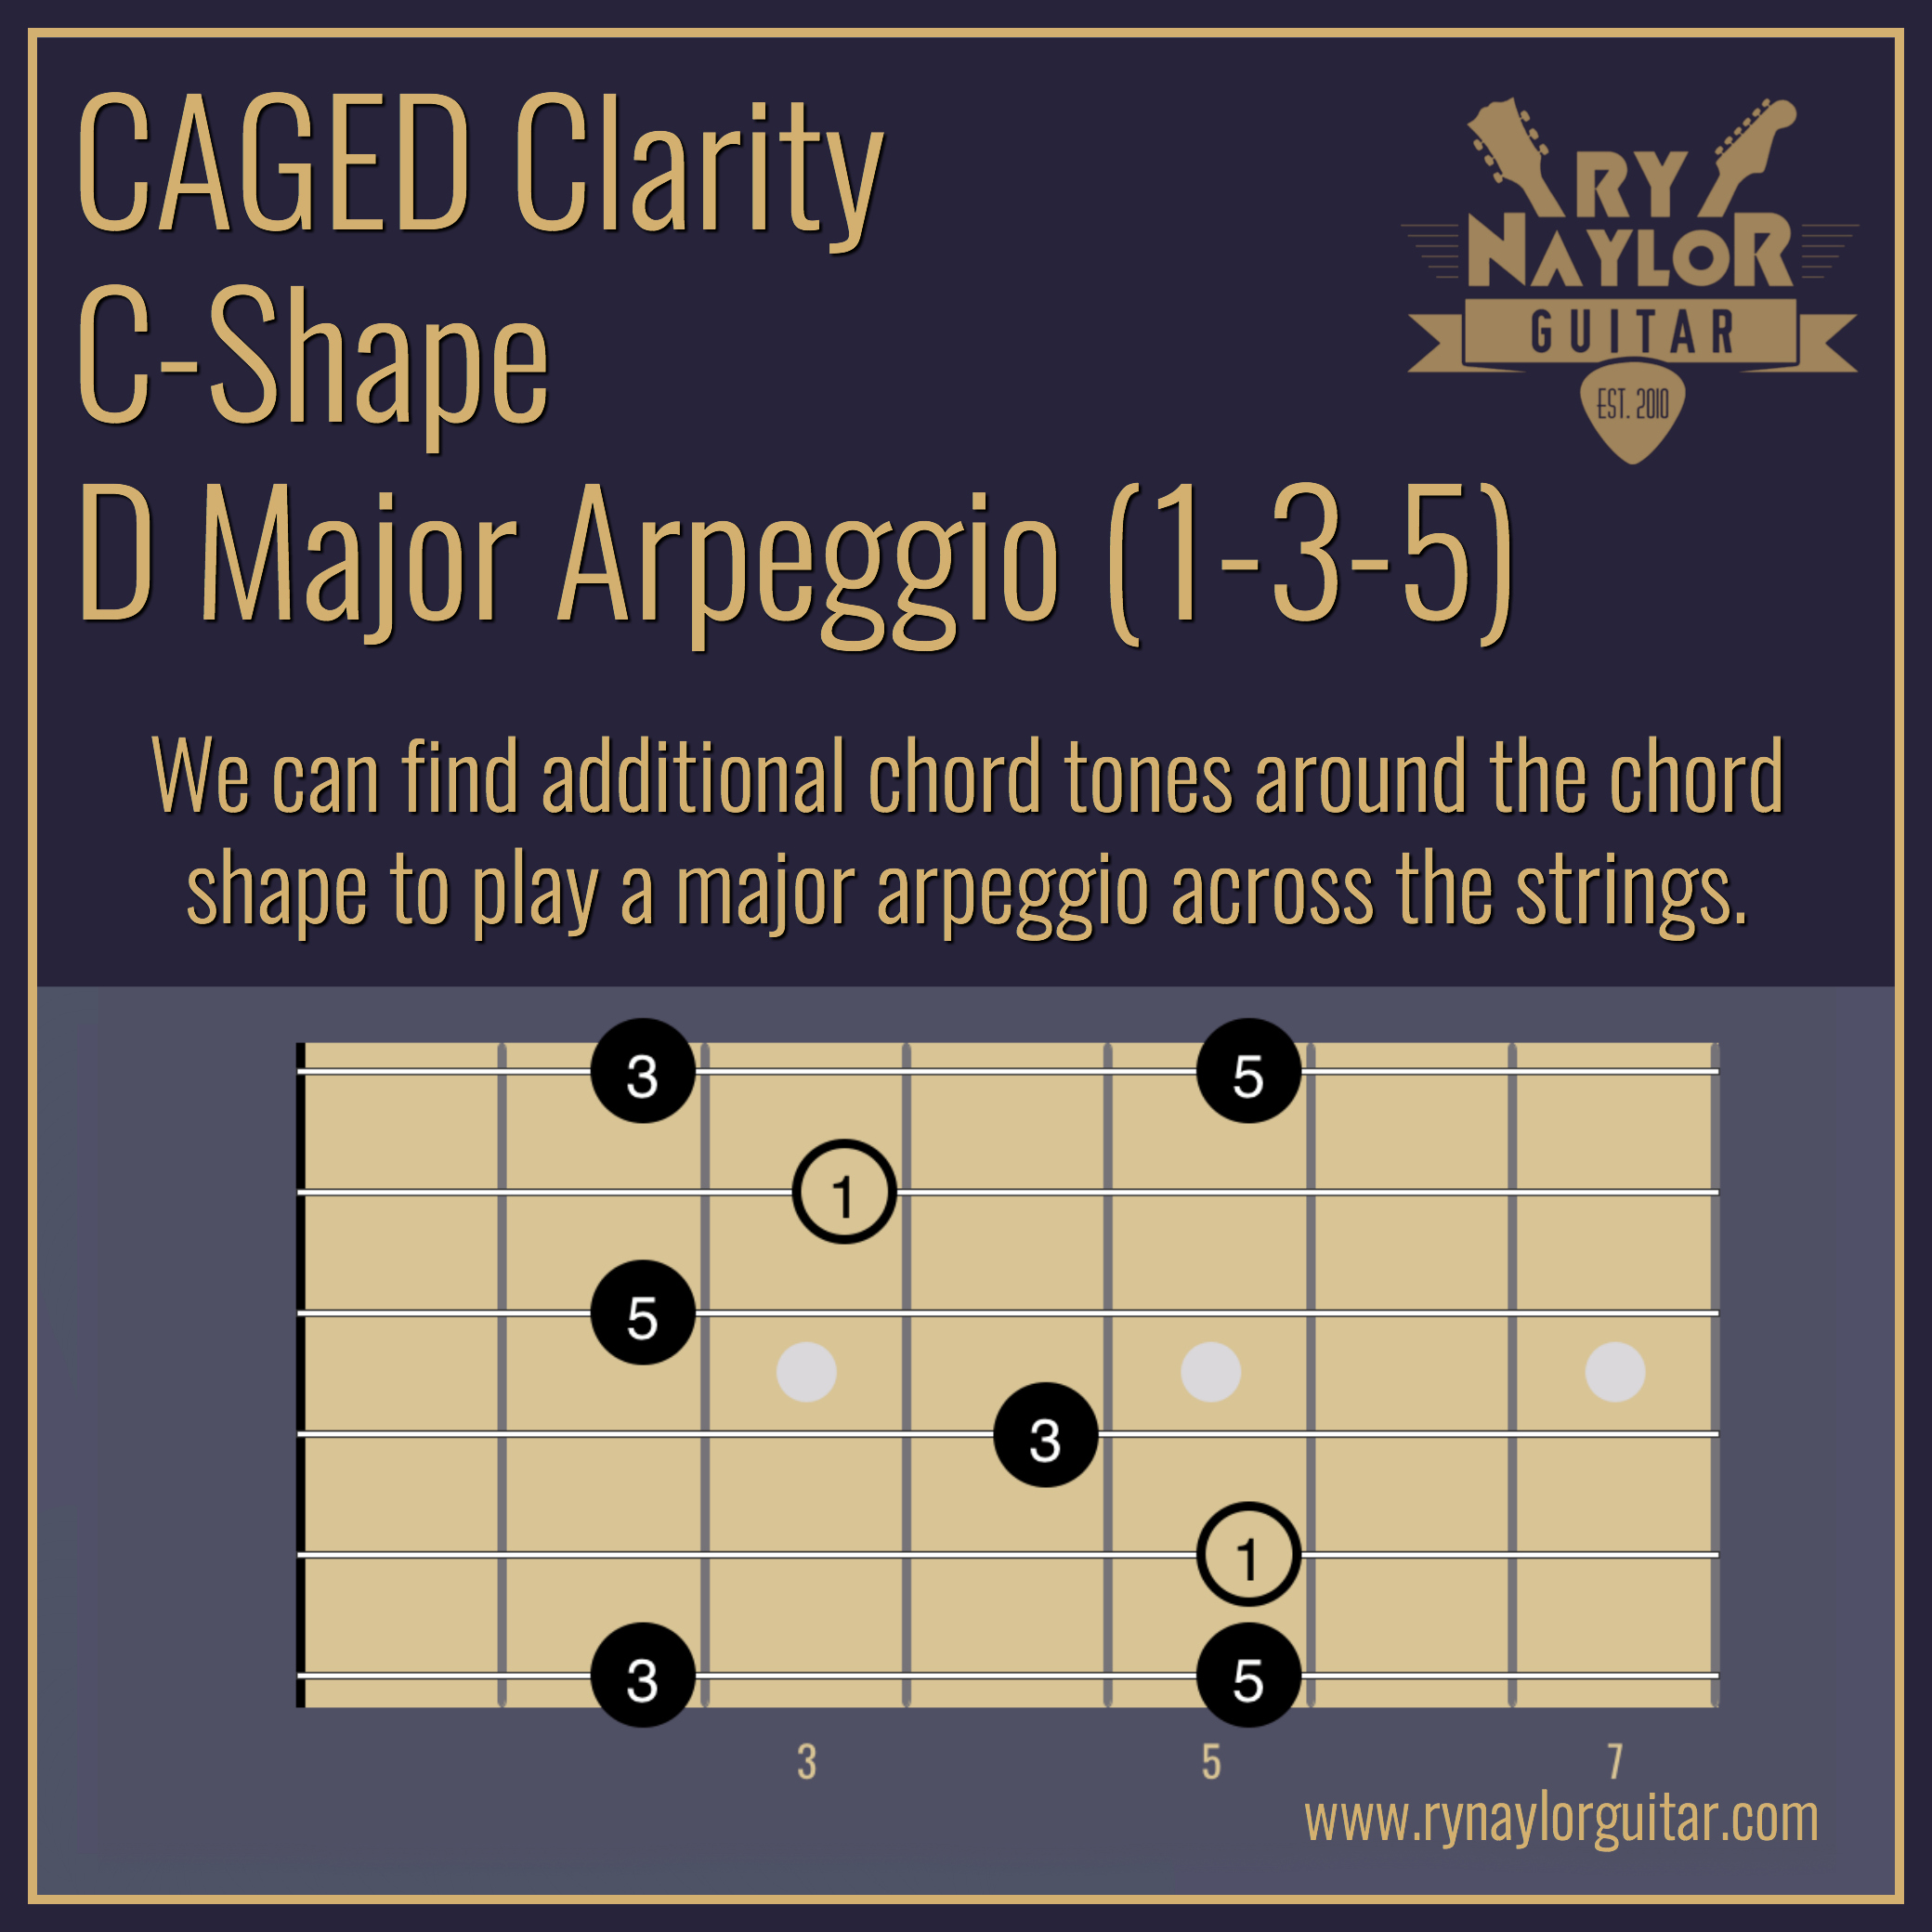
Major Arpeggio

The C-shape chord is one of the easiest when it comes to playing arpeggios because the intervals of the chord (Root - major 3rd - perfect 5th) are found in order across the strings when we start from string 5(A).  The arpeggio falls nicely inside a 4-fret radius and we can reach for the 5th on string 1(E) at the 5th fret with finger 3 or 4.  Whilst the tonic is on string 5(A) the arpeggio can continue in the lower octave on string 6(E).  Notice how the notes on string 6(E) will always be the same as string 1(E).  Seems obvious but often overlooked when learning patterns on the fretboard.  Also, I don’t like to use the term ‘Root’ when it refers to melodic playing.  The Root is the starting point for a chord.  When we think about melody, this note (is these examples D) is called the 'tonic' and I will use the abbreviation ‘1’ instead of ‘R’. 

Major Triad Shapes

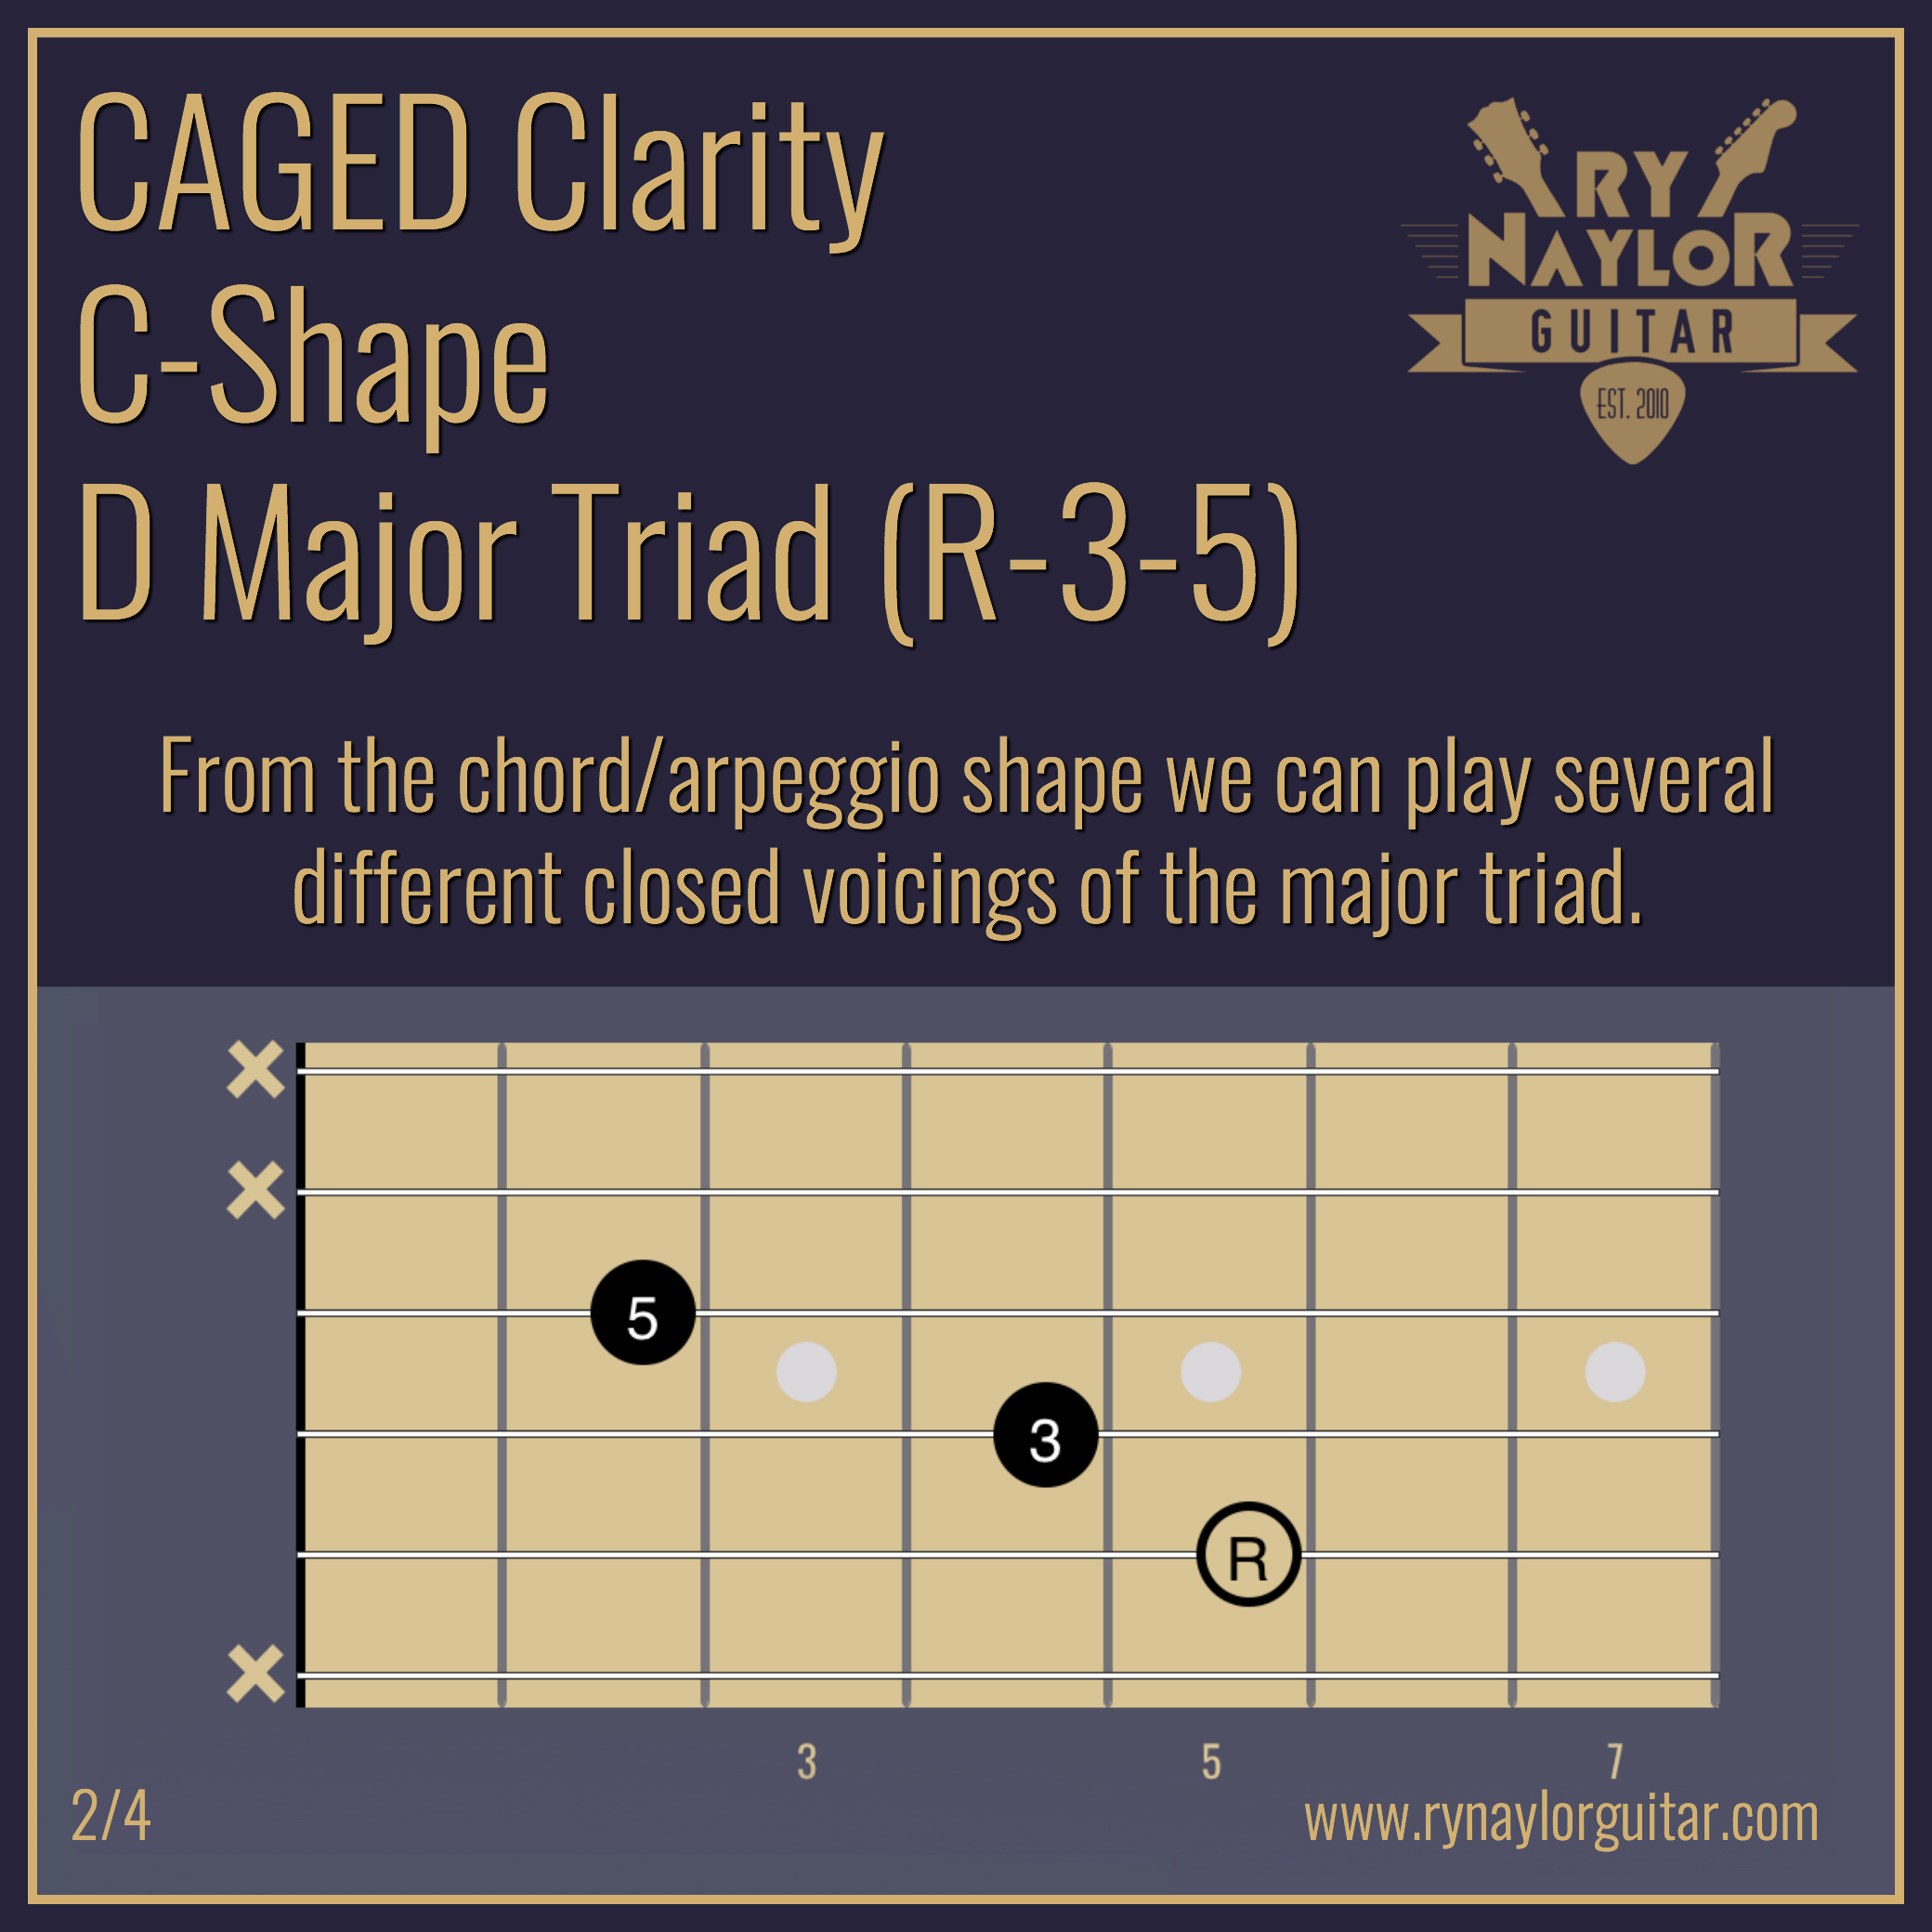
One of the immediate benefits of the CAGED approach for rhythm playing is the ease at which we can visualise triad shapes. The major triad consists of three (hence tri- ) elements: The Root note (D), a major third above the Root (F#) and a perfect 5th above the Root (A). There are four possible grips for these three notes across the 6 strings. With our Root note on String 5(A) this first shape has the 5th as the lowest note in what is called a ‘second inversion’ of the triad (or D/A - D chord over an A bass note). These triad shapes are known as closed voicings in that the notes will appear in order (5-R-3, R-3-5, 3-5-R, 5-R-3) and are as close as they possible can be to one another. 

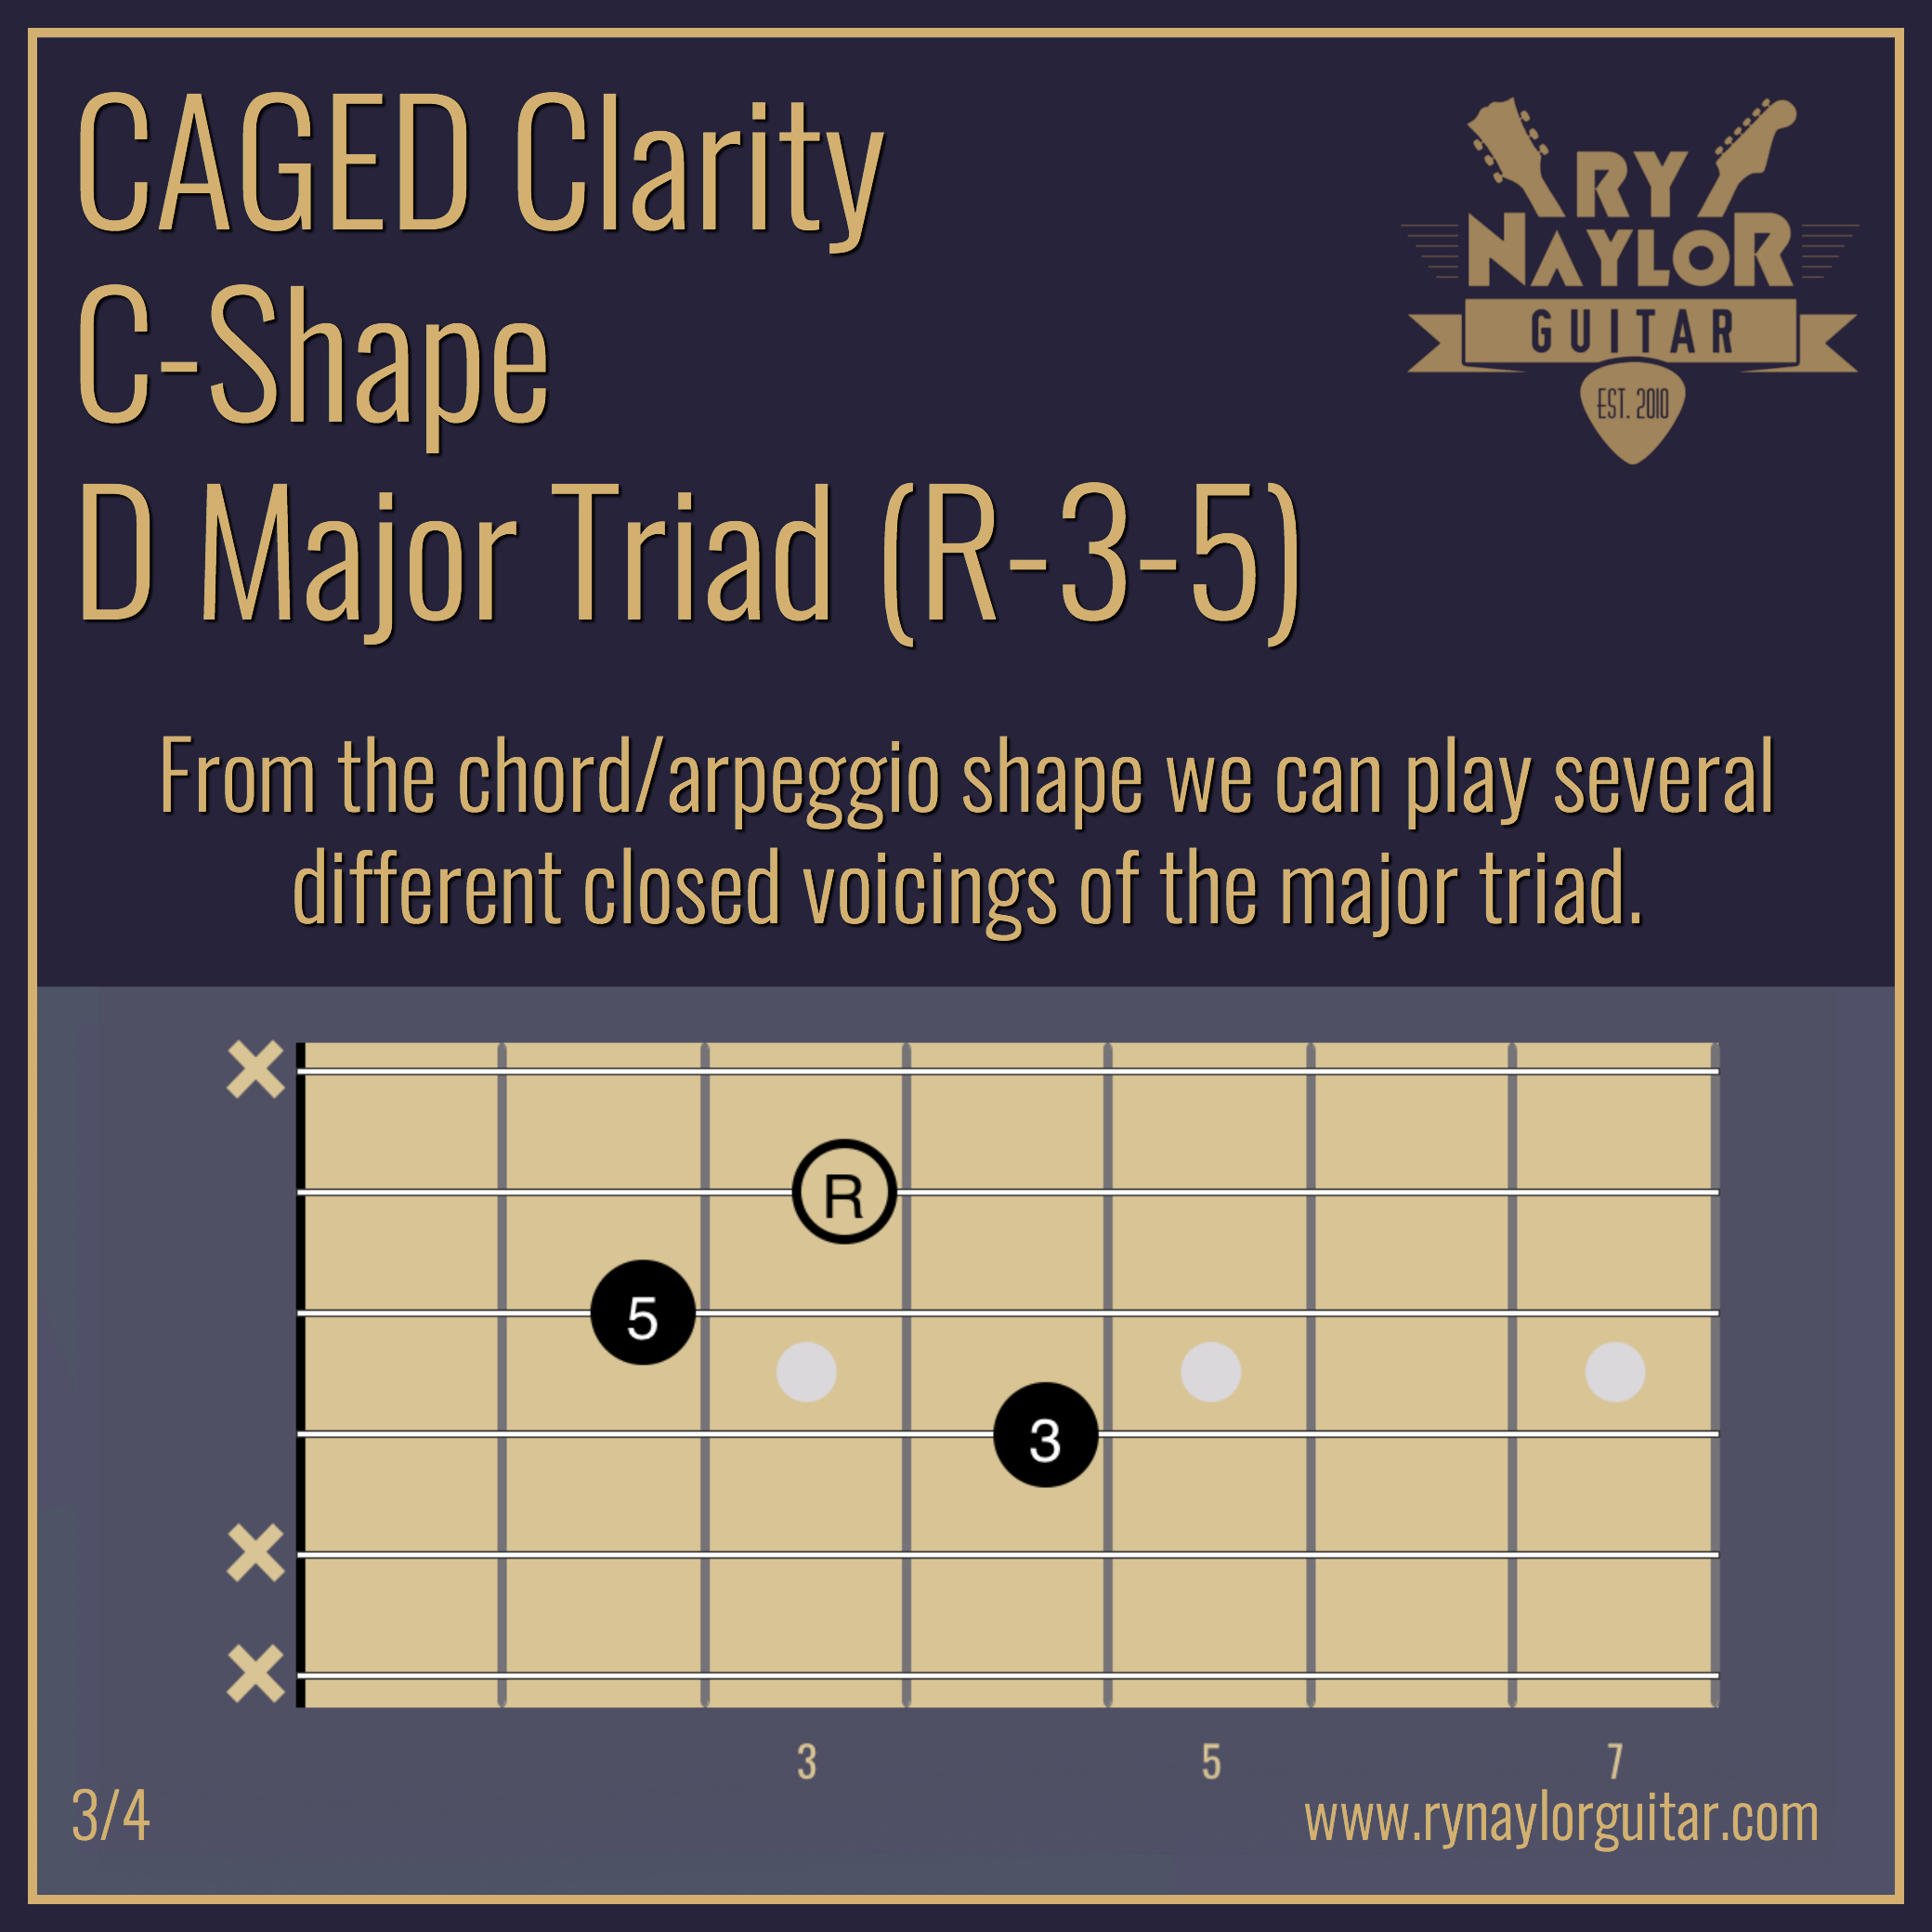
Raising the 5th an octave from string 6(E) to string 3(G) gives us a closed voicing of a Root position major triad (I.e. the Root is the lowest note played).

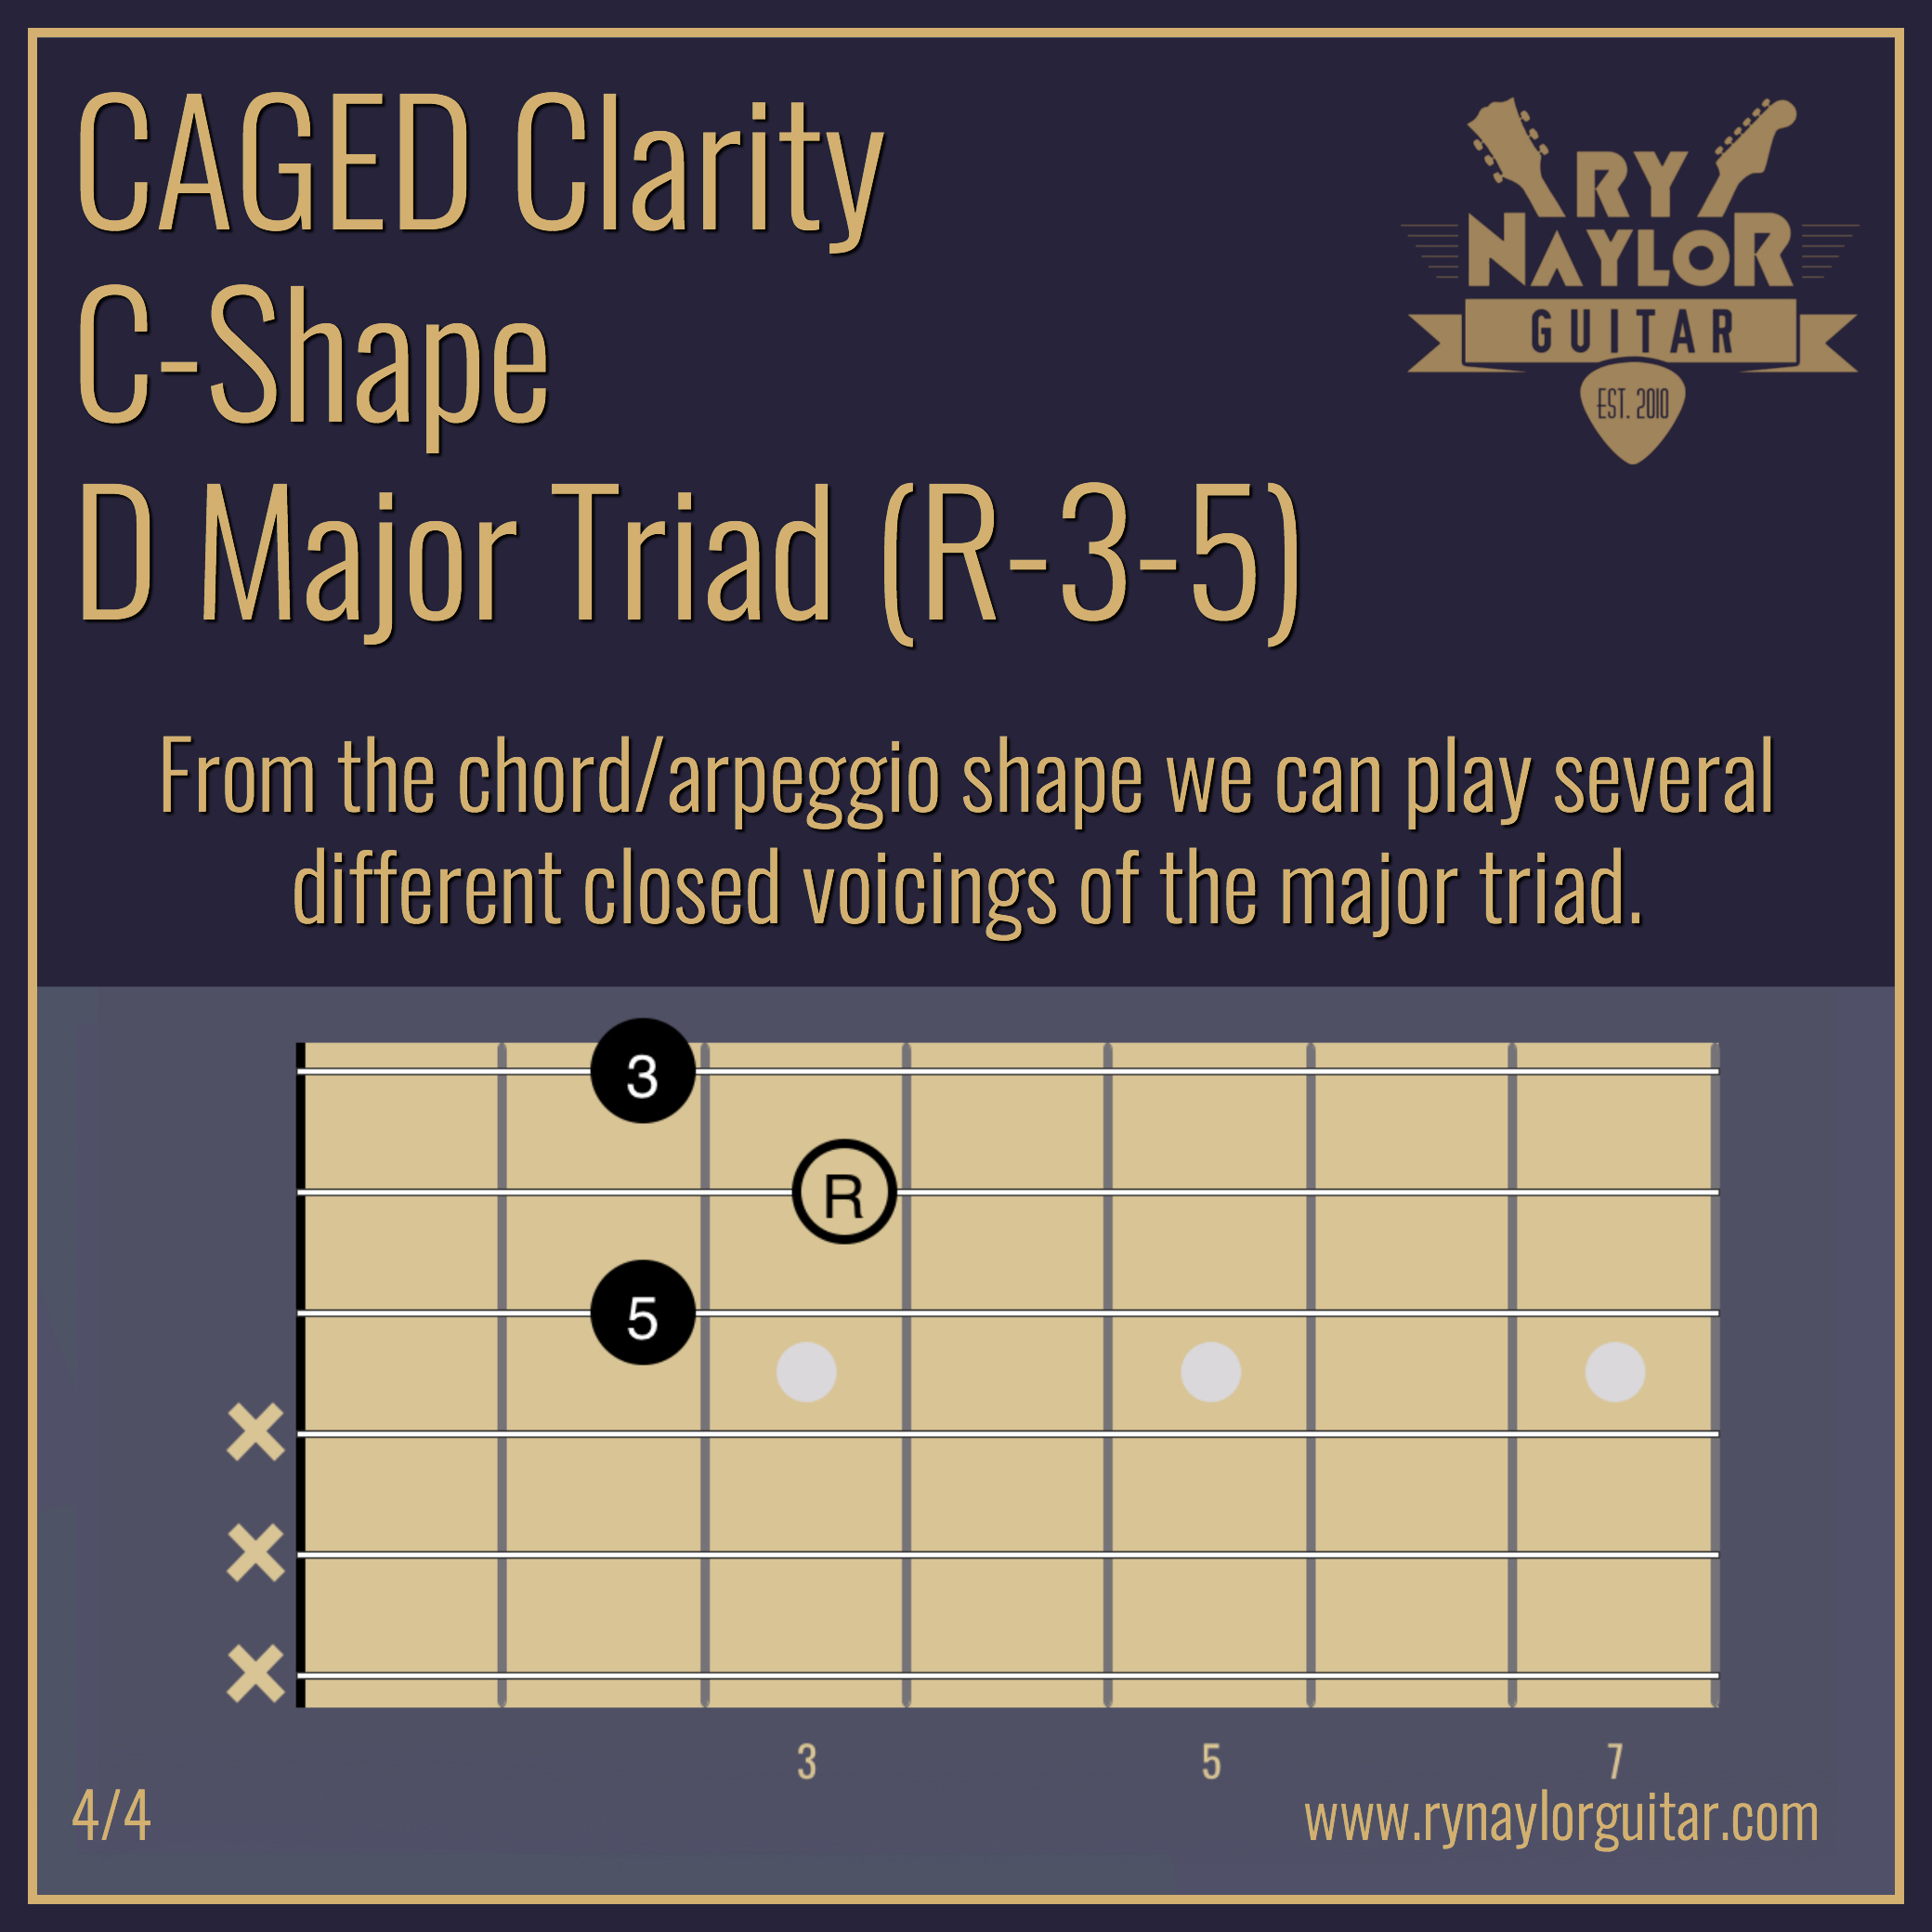
Raising the Root an octave from String 5(A) to string 2(B) creates a great voicing of a ‘first inversion’ triad (D/F#) in which the third of the chord is the lowest note played. Remember to try and visualise the full chord shape as you play this to know where the other chord tones are. 

Raising the 3rd an octave from String 4(D) to string 1(E) creates the much-loved D major chord, except that without playing the open string 4(D) this is a moveable second inversion major triad shape (D/A).
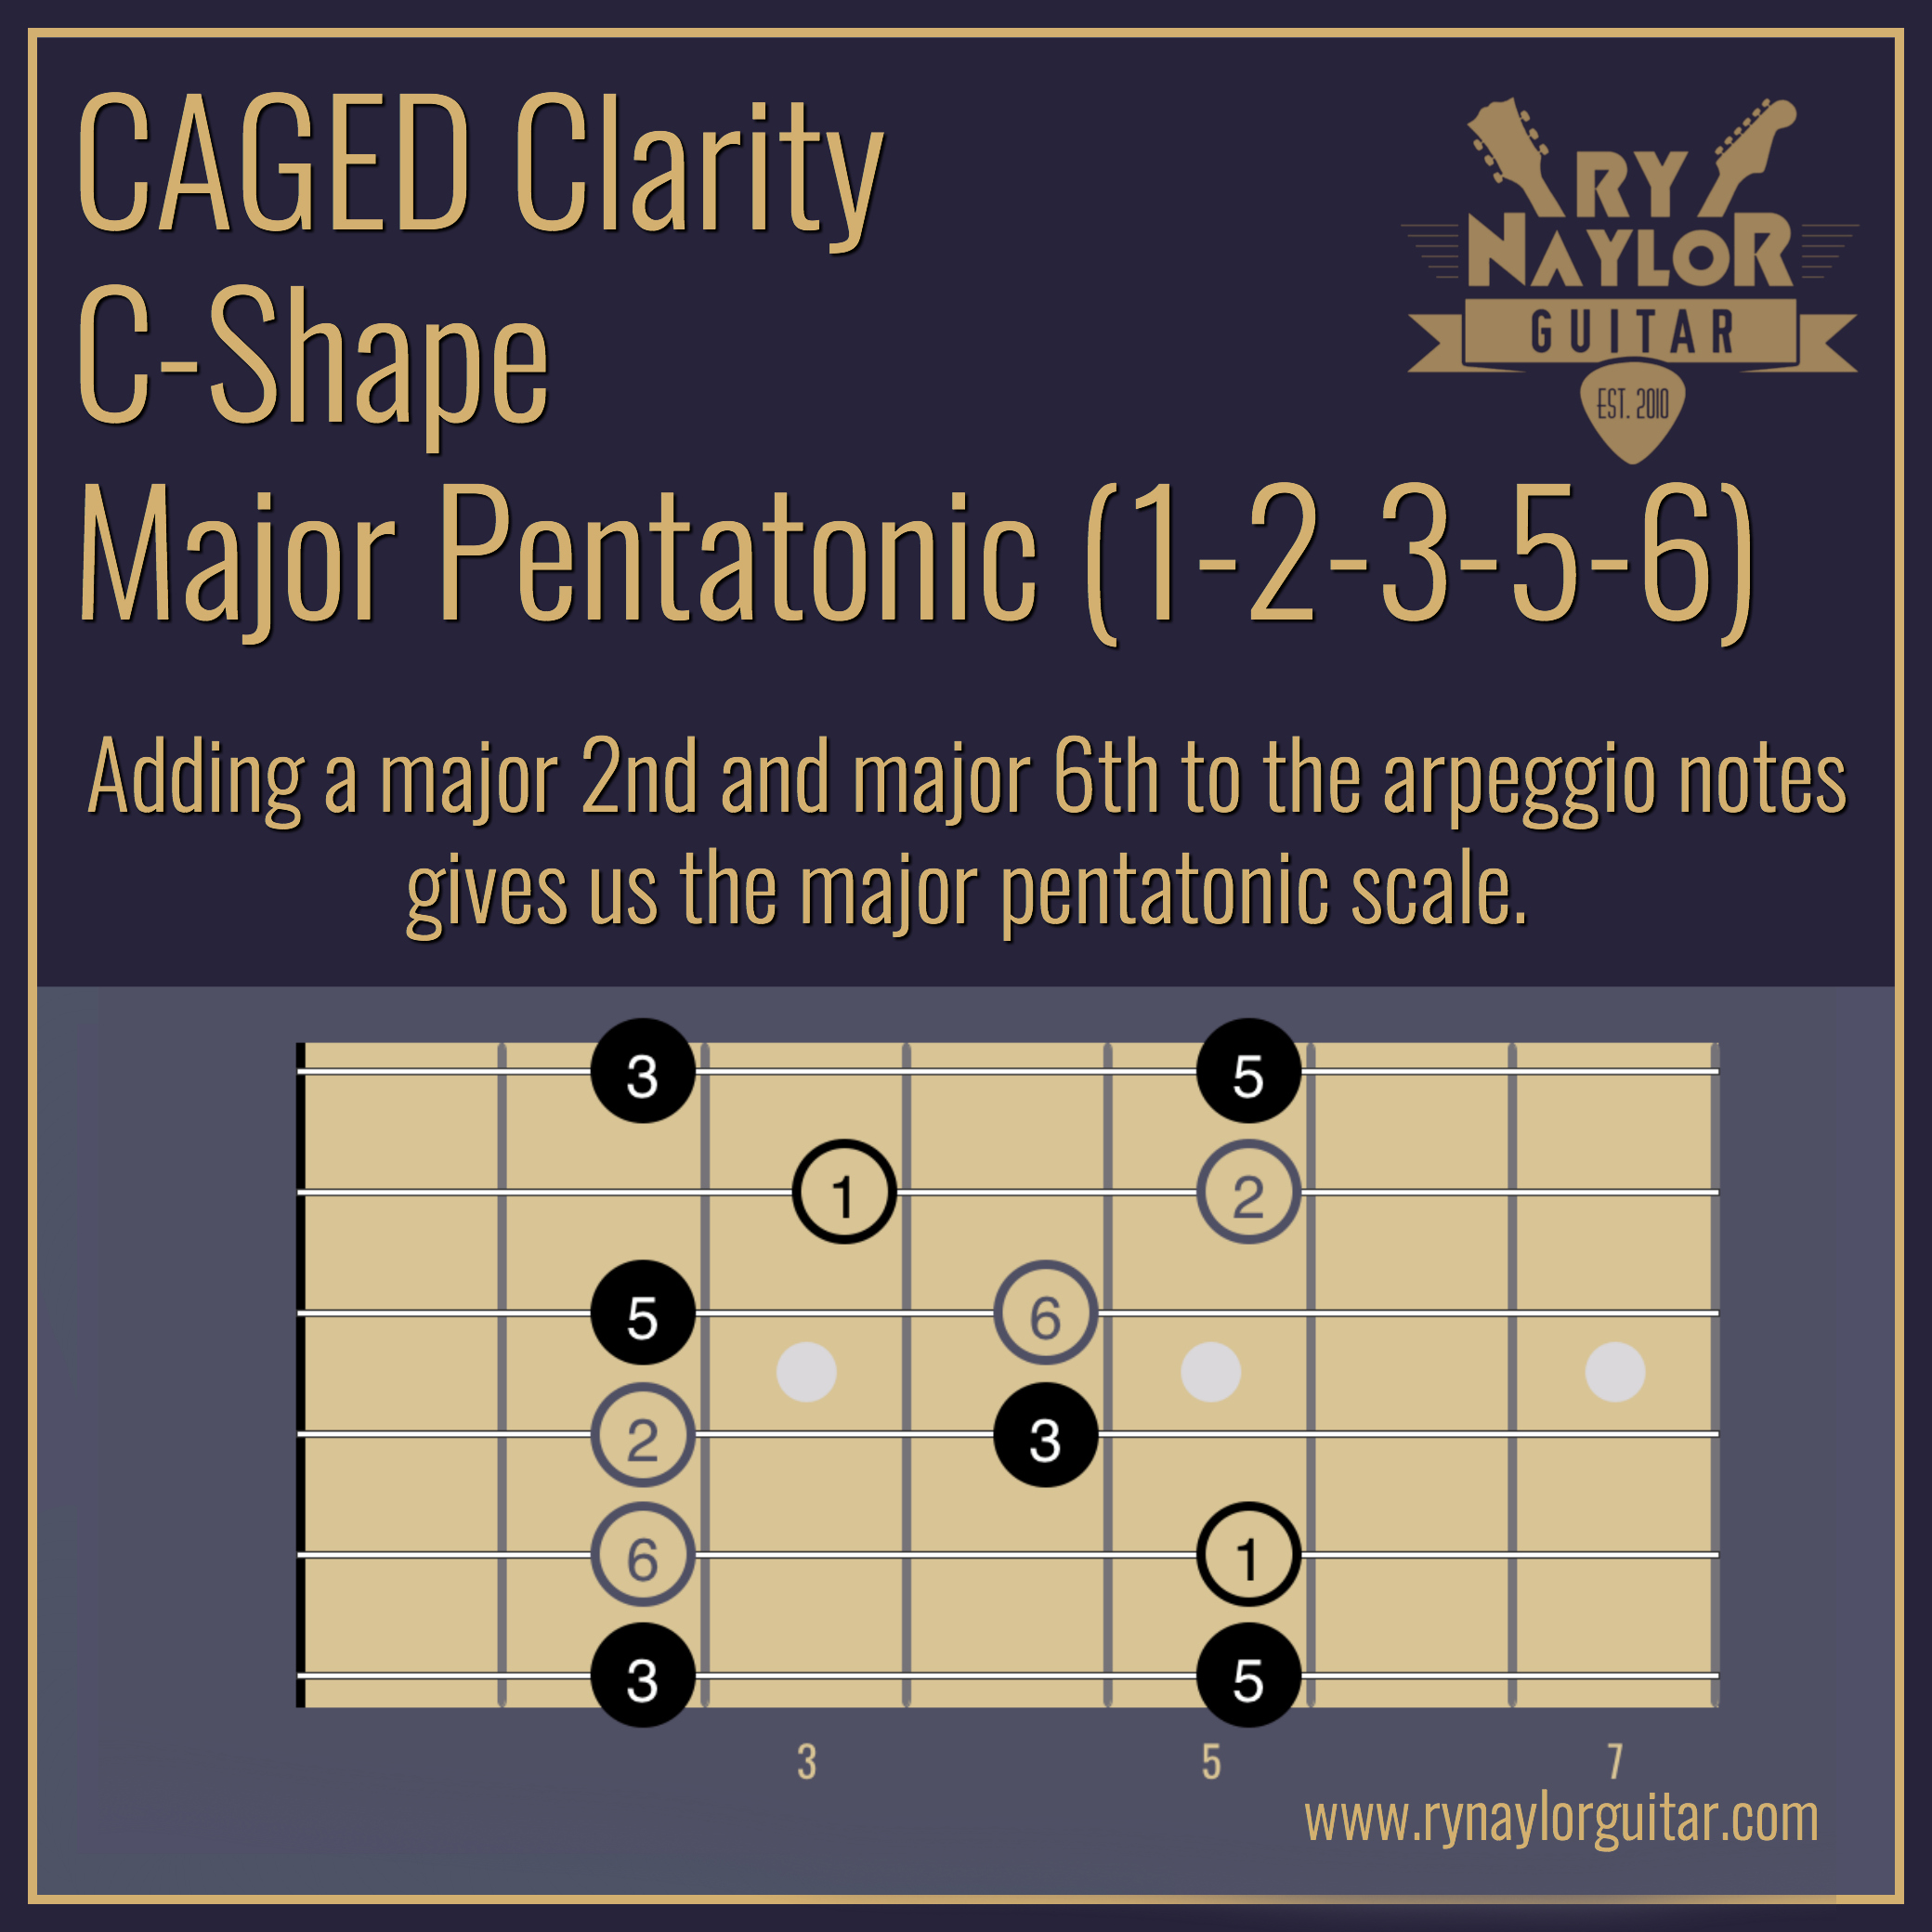
Major Pentatonic

This is where things get interesting.  Let’s take it back to the major arpeggio pattern.  We have three notes, the tonic (1) major 3rd (3) and perfect 5th (5). Playing those three notes together gives us the sound of the major chord (major triad).  BUT if we add an additional two notes we will have a total of five notes…’penta’-tonic.  Adding the major 2nd and major 6th will give the five notes of the major pentatonic.  At each stage we’re building upon the octave shape and chord.  Therein lies the power of CAGED approach and why you should learn this stuff!
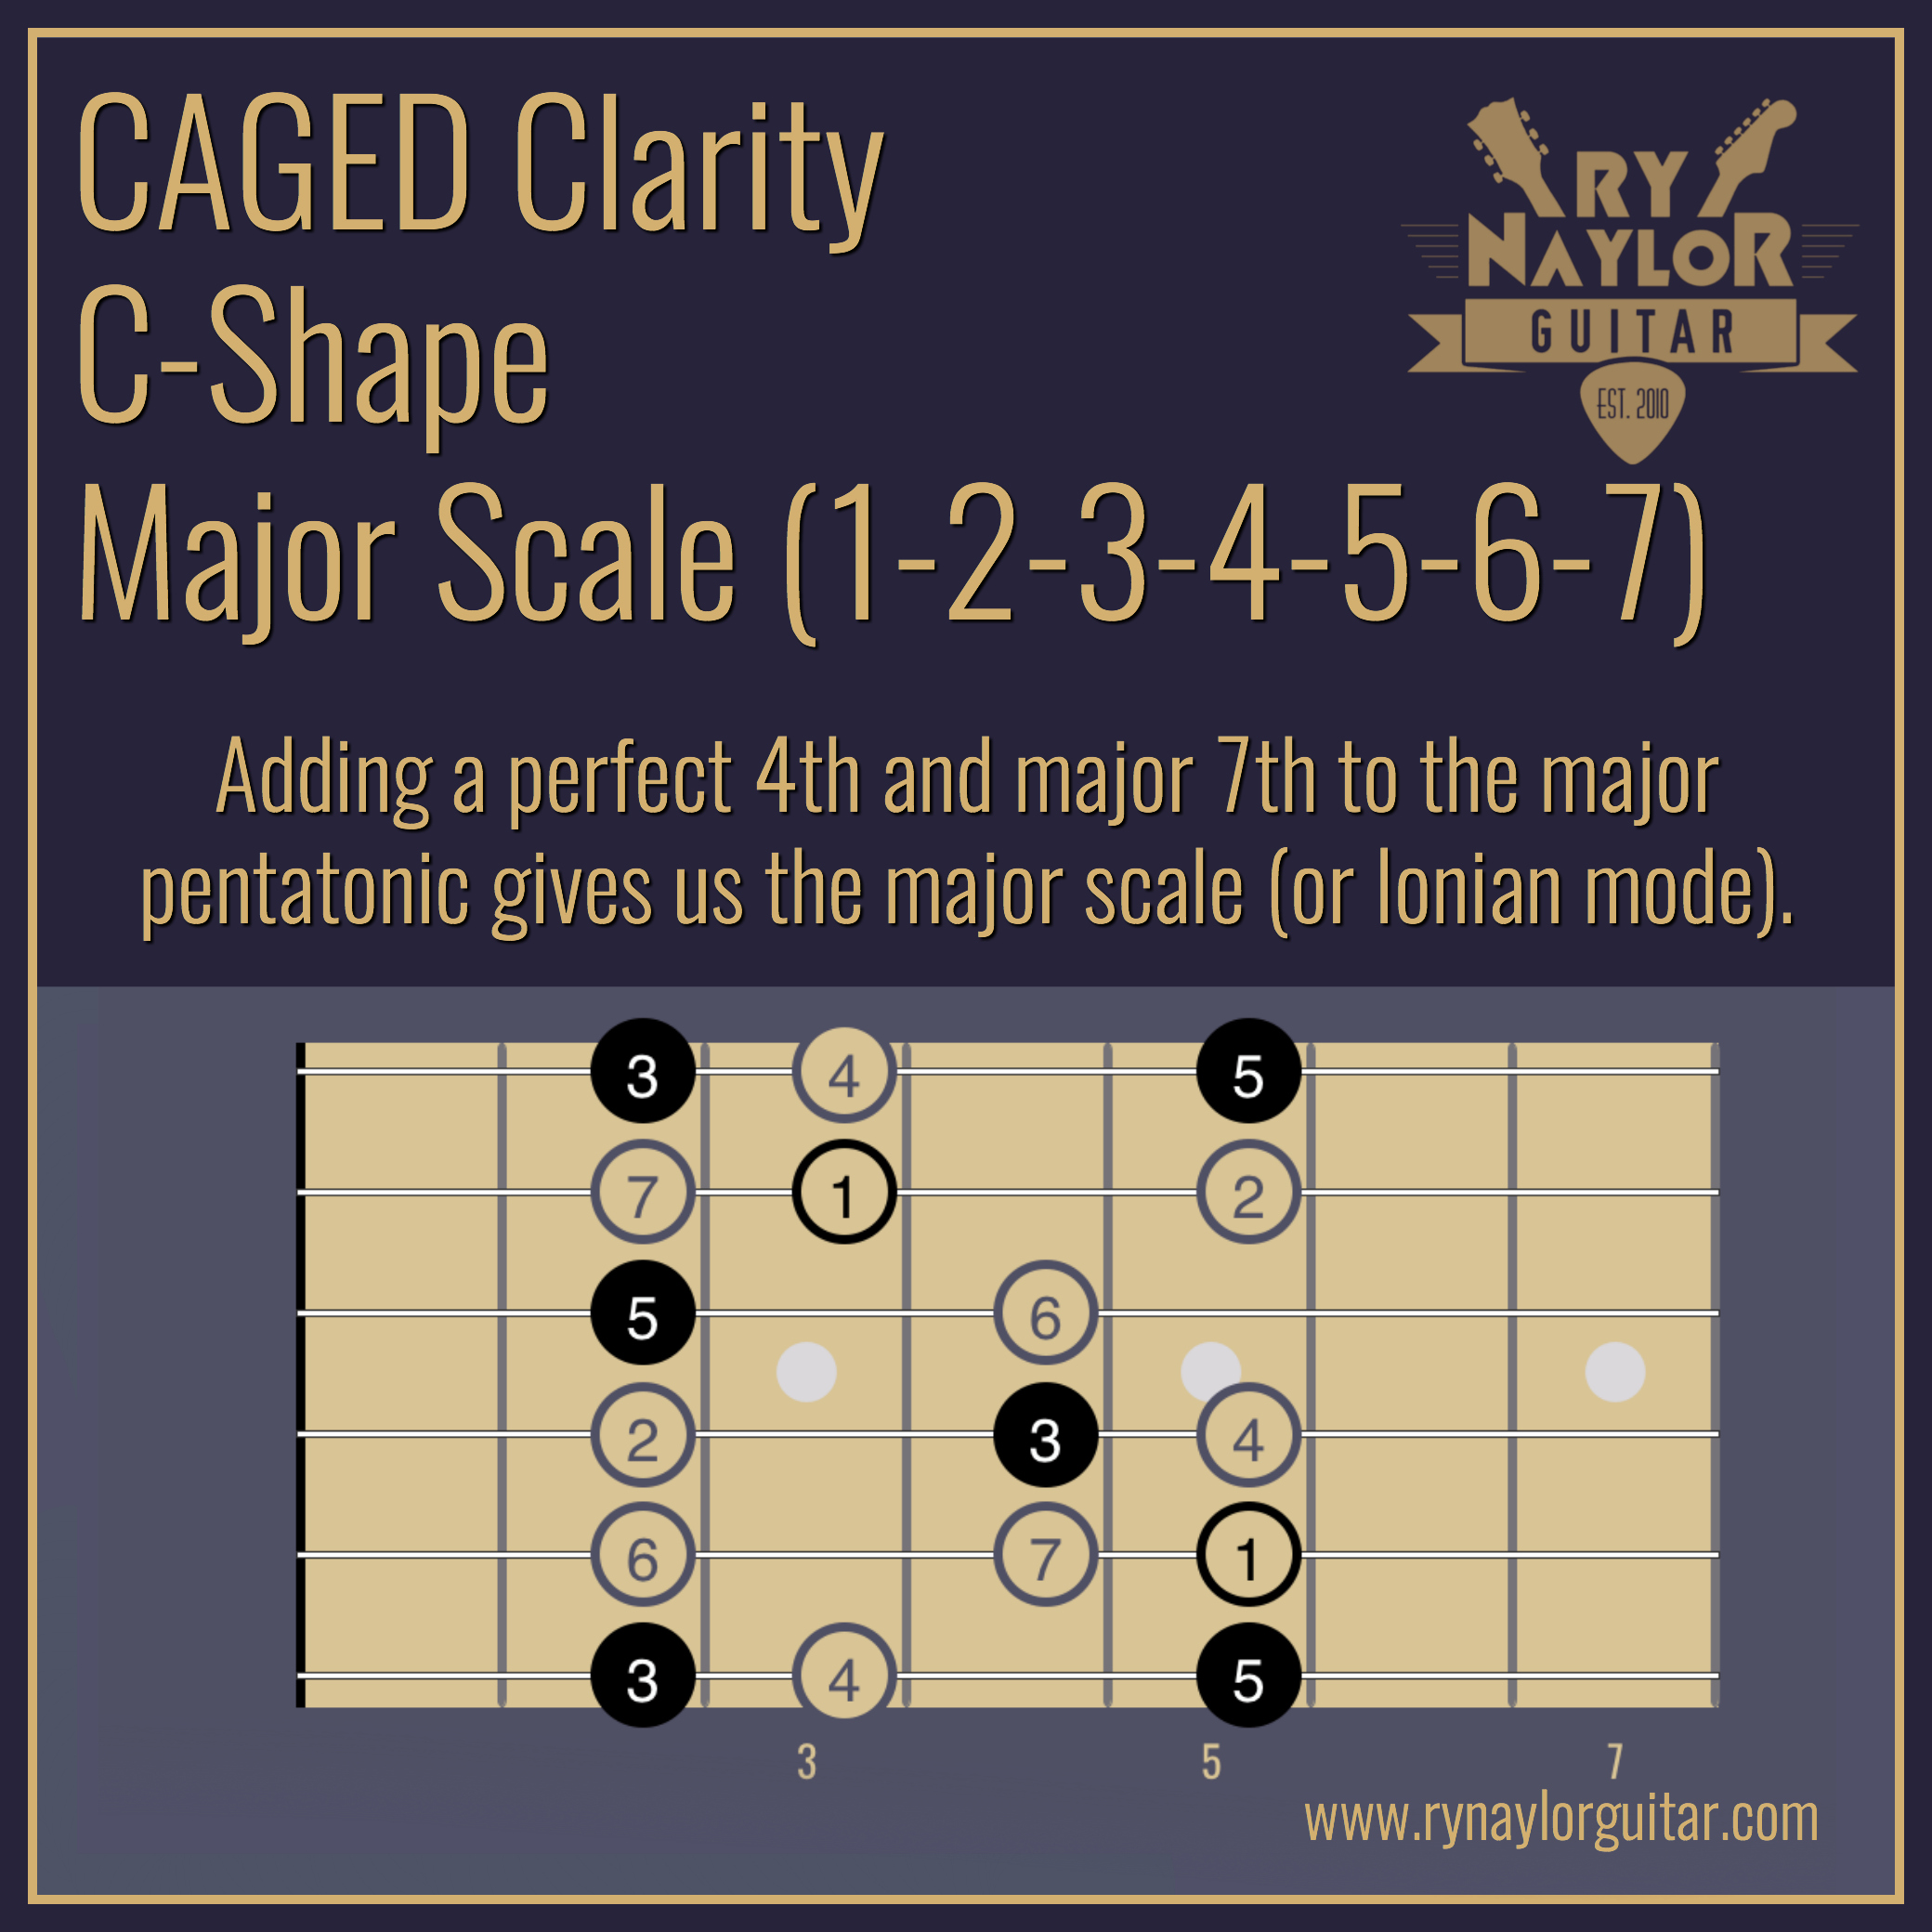
Diatonic Scales

From the five notes of the major pentatonic we add an additional two to give us a seven note diatonic scale (with each letter of the musical alphabet being present within one octave). The two notes we add are the perfect 4th and major 7th to give us the sound of the major scale (also known as the ionian mode).  The other major modes (lydian, mixolydian) can be created in the same way.  For lydian we would add an augmented 4th and major 7th, mixolydian has the perfect 4th and minor 7th.


I'd love to take any questions in the comments of this post.  If you're desperate to get learning the fretboard I have a free eBook available to all email subscribers.  You can get your copy of 'Fretboard Mastery' here.

Awesome chord grips courtesy of The Police's Andy Summers

In a recent lesson with a student we began with some stretching exercises which led me into a discussion of add9 chord grips (which are awesome as a stretching exercise).  Discussions then went to the music of The Police and the chord choices of their guitarist, Andy Summers, in some of their most iconic songs.  

I can't claim to be any aficionado on The Police but I did know that Summers used sus2 and add9 grips in songs such as 'Message In A Bottle' and 'Every Breath You Take'.  Now, I love the sound of these chords and so I thought I'd bring it to my YouTube channel in this week's lesson.  

Below are chord boxes that I uploaded to my Instagram feed in support of the video lesson:

Learn how I like to transcribe songs

A recent song request of 'Coastline' by Hollow Coves inspired me to take you behind the scenes of how I work out songs and write out tabs. I'll show you exactly how I learn and transcribe all the music that I teach on my YouTube channel and with live students.

Whenever I do this I try and work from a live recording to see exactly how the part is being played. For this particular song the video showed me that the capo was placed at the 7th fret which then confirmed that the guitar wasn't in standard tuning.

The transcribing software I use is called Transcribe! and it's great because you can use video or audio files. Transcribing software allows you to slow down and loop particular sections. You can even manipulate the audio channels and EQ to make the part you're transcribing easier to hear.

Some players like to transcribe manually with pencil and paper, but I prefer to go straight into Guitar Pro. I'm using the latest version, Guitar Pro 7.  I find this is easier to change mistakes and it can help to be able to quickly play back what you've transcribed to check it sounds right.

I hope you find this informative and that it might encourage you to start transcribing guitar yourself.  I've added links to all the software that I use in the video under the 'Ry Recommends' section of the website.  You can find it here.

A beginner's approach to Travis Picking

I had a great song request from a Skype student recently that got me teaching some Travis picking patterns. The song was 'Just Breathe' by Pearl Jam and it uses a picking pattern heard in other songs like Kansas' 'Dust In The Wind' or Fleetwood Mac's 'Landslide'.

A Travis picking pattern is one that has a constant alternating thumb pattern on the quarter note beat, with the index and middle fingers plucking in between the beats. It's a great way to bring driving, rhythmic feel to any chord progression.

In this video lesson I take you through how you should try and practise a Travis picking pattern progressively in stages to really get confident in the picking hand. The key things here are to build up the pattern gradually, always use a metronome and try to keep things musical and interesting for your practice sessions.

You can download a free .pdf of the TAB with all the examples demonstrated in the video by clicking here.

An Introduction to Open D Tuning

There inevitably comes a point in our playing where we tire of playing the same things in the same old standard tuning and we crave something different.

A great way to fuel creativity and reignite any waning interest in the instrument is to try a different tuning.  Anything that isn’t standard tuning is considered ‘altered tuning’.  A common first altered tuning is ‘Drop D’ in which string 6(E) is tuned down a tone to a D, giving a power chord under one finger across the three low strings.  It’s probably for that reason that it’s found favour with rock and metal players.  

My newest video lesson explores another altered tuning named ‘Open D’ or ‘D Vestapol’.  An open tuning is one in which the open strings are tuned to an easily recognisable chord, in this case a D major chord.  Open tunings are often used by slide guitar players, but I’m introducing the idea of playing some beautiful diatonic chords using a combination of two different chord shapes and the open strings. 

You can download the on-screen TAB that accompanies the video by clicking here.

As always I am available to take any feedback or questions you might have.

Practise well!


How to easily add colour to your open chord progressions

I'm excited to share with you my new video lesson on a fail-safe approach to adding colour tones to your open chords. Colour tones are simply additional notes that change the sound of a chord to give them a fresh, exciting feel.

It can be hard to know exactly which notes are available to us as we try this, but I have the solution if we are working with diatonic progressions. These are chord progressions that you can expect to find in most popular music as the chords come from the same major or minor scale.

All we need to do is be familiar with a major scale pattern in the area of the fretboard in which we are playing our progression, most likely in the open position (the first four frets of the guitar). 

My example in the video is a I-V-ii-IV progression in the key of G, namely G-D-Am-C. I show you two ways to play the G major scale inside the first 5 frets to provide a blueprint of 'good' notes that you could look to add to your open chords.

I show you several different examples for each of the four chords and a sample progression that I demonstrate at the beginning and end of the lesson.

Whilst you're feeling your way around this approach I have created a 'Custom Key Chord Chart'. This worksheet has the key of G major and the notes each chord contains at the top, and 16 chord boxes with the major scale patterns included. There are two worksheets, with and without the note names. I would recommend that you print off the sheets (which you can download by clicking the image below) and use a marker pen to draw in the notes that you think sound good together to create your own custom chord chart

I hope you find this approach really enjoyable and inspiring.  Please feel free to email me with any feedback and questions you might have and I'd be happy to help.

Essential Technique for Picking Arpeggiated Chords

Whilst I was transcribing The Who's 'Behind Blue Eyes' (which popped up on my Spotify 'Daily Mix 1' recently - it's an awesome song!) I got the inspiration to create a lesson on how best to approach picking patterns like those in the acoustic guitar part at the beginning of the song.

It's fast and near impossible to play cleanly (at least for me as you will have seen if you follow me on Instagram) with all down picks or all up picks. We need to add a little alternate picking into our technique trick bag.

So in this week’s lesson we’re looking at how you should approach any picking pattern that uses a flat pick to ensure that you are economising the movement of the picking hand.  In turn this will help to increase picking speed and accuracy.  

You can get exclusive access to the FREE lesson notes by signing up to my newsletter.  Simply enter your details below and get my detailed notes in your inbox in just a couple of minutes.

How to change the 'feel' of a chord progression with a little theory and a capo

When we're just starting out at guitar, barre chords and awkward grips can be just a step too far.  Now, I would always encourage working on barre chords as soon as possible to develop fretting hand strength, but I'm going to show you how, with the use of a little theory and a guitar capo, you can move your favourite progressions into a more comfortable 'feel' i.e. open chords. 

This is a technique I use extensively with beginner students but it also has a lot of value when trying to come up with a second guitar part if you play with another guitarist.

You can get access to the FREE lesson notes, including the table I demonstrate in the video lesson by signing up to my newsletter.  Simply enter your details below and get my guide to transposing in your inbox in just a couple of minutes.

Until next time...practise well.

F#? Bb? Confused by key signatures? This lesson will help

After a long break I'm back filming videos (and posting on this blog!) and I thought it time to continue my 'Guitar Theory' course - practical music theory for guitarists to better understand the instrument and music more generally.

This week's lesson concerns key signatures.  This refers to whether the music we are playing contains any sharp or flat notes.  This will depend on the 'key' we are playing in, which in turn depends on which scale the music is using because chords in a key are derived from scales.  That's for an upcoming lesson but for now...

To date we have discussed the major scale and how it is played.  We had a major scale if we were to play one octave of the C major scale (CDEFGABC).  If we list the distance from one note to the next we had the major scale formula (Tone-Tone-Semitone-Tone-Tone-Tone-Semitone). 

The C Major Scale played horizontally on string 2.

The C Major Scale played horizontally on string 2.

If we move the first note (or 'tonic') away from C and play one octave of the musical alphabet starting from, for example, the note G (GABCDEFG) we no longer have the sound of the major scale.  Why? Well, because the major scale formula only works with the musical alphabet when we start on C. Starting on G gives us this:

One octave of the musical alphabet starting from G...NOT a major scale

One octave of the musical alphabet starting from G...NOT a major scale

The video lesson below will explain how we can resolve this problem to be able to play a G major scale or any other major scale.  Yep, you guessed it!  We need some sharp and flat notes. 


NEW LESSON - My favourite minor pentatonic scale pattern

I've recently posted a new lead guitar lesson on my YouTube channel going through the minor pentatonic scale.  I review exactly what the minor pentatonic scale is and the popular position 1 minor pentatonic.  From there I'll show you one scale pattern in particular that I love to use to easily move up and down the guitar fretboard.

You can watch the video and get the free pdf tabs and fretboard diagrams by clicking here

We've been tuning our guitars wrong...according to James Taylor

I've seen a couple of videos an blog posts discussing James Taylor's slight tweaks to standard tuning so I was interested to see what he had to say.

In the video below posted from his YouTube channel he recommends tuning each of the strings slightly out of tune to compensate for the use of a capo and the fact that the bass strings ring out of tune when they are struck.

To do this you will need a metronome that shows how many 'cents' you are from 440 tuning.  A cent is 1/100th of a semitone (or half step).  In summary, Taylor recommends you tune the strings a certain number of cents below standard tuning (i.e. when the tuner is telling you the string is perfectly in tune):

Low E = -12 cents

A = -10 cents

D = -8 cents

G = -4 cents

B = -6 cents

High E = -3 cents

Have a try and see if you can notice the difference.

The Ultimate Exercise To Learn The Notes on the Fretboard

A fretboard diagram that will be useful for this note finding exercise 

In a recent series of posts on my Instagram feed entitled 'Learning The Fretboard' I shared a number of essential concepts and shapes that will radically accelerate your learning of notes on the guitar fretboard.

My final post in the series was the video below which details what I think is the best exercise for learning the fretboard.  It certainly worked for me!.  

This is an exercise taken from Joe Satriani's book 'Guitar Secrets' (a great compilation of articles written by the guitar legend).  

What you need is a fretboard diagram of all the notes and a metronome.  Taking each of the 12 chromatic notes in turn, your goal is to play that given note on all six strings, from string 6 to string 1 and back.  Each note will appear on every string in the first 12 frets. 

But, you must pick the notes in time with the metronome click.  Work at a slow tempe (50-60 BPM) and with the fretboard diagram in front of you if you need.  Take 3 or 4 notes every practice session (I like to work around the circle of fourths - A-D-C-F-Bb...)  

Keep working at increasing the tempo until you feel confident that you know where the notes are.

Good luck!